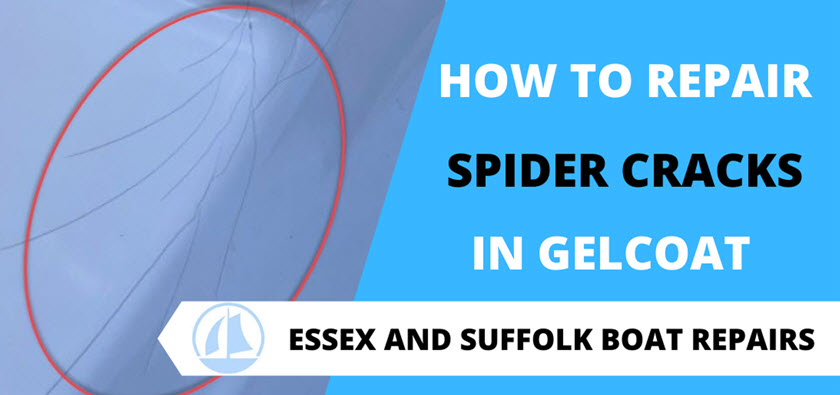
In todays post we’re going to be covering something that I’m sure most people have come across in some form or other when it comes to owning a boat ……. spider cracks!
Once you’ve finished reading this guide you’ll know exactly how to repair spider cracks in gelcoat and get those pesky cracks fixed once and for all.
Having repaired numerous cases of spider cracks over the years I have tried different ways to tackle them.
Out of all the methods the best way to make an invisible repair and make sure they don’t come back is to grind them out.
Some people try to take out each individual crack with a Dremel type tool and while this may work for one or two cracks the final repair once it comes to putting gel on still won’t look as good.
Some people simply gel over the crack area and while it looks ok for a week or two the cracks will inevitably begin to show through again.
Table of Contents
What Causes Spider Cracks?
Before we get into how the repairs should be done let’s take a look at what causes them in the first place.
Most people generally think that spider cracks appear as a result of an impact or stress around certain points on the boat and while this can certainly be the case a lot of the time the cracks have been there from day one.
When the boat mouldings are being released from their moulds in the factory they can flex too much and as a result the gelcoat cracks.
Sometimes the cracks even transfer through to the fibreglass itself.
Unfortunately they aren’t always visible and the boat is sold without the cracks being repaired. It’s only when dirt gets ground into the cracks do they become visible.
This could be years down the line and the boat owner simply thinks something must have hit them and caused it.
The Repair Process
For you to successfully repair spider cracks you’ll need to break out your angle grinder. I know some of you may be a bit hesitant to take a grinder to your boat but it really is the best way.
Do it once, do it right and all that jazz.
Before you begin you need to highlight the cracks, the last thing you want is miss any.
PRO TIP:
I use black paint sprayed onto an acetone cloth and wipe the entire area so it's covered in black paint.

That paint will seep into any cracks that are there. I then wipe the entire area with a clean cloth with acetone on it which will remove the black paint, but it will leave it in any cracks which makes them easily visible.
With grinder in hand you need to remove all the gelcoat from the highlighted area down to the fibreglass. At that point you’ll be able to see if the glass itself has any cracks in it.
They will show up as whitish lines which will also need to be ground out and if that is the case you can find out how to do that here.
Filling The Area
Working on the assumption you didn’t need any fibreglass repair you’re going to need to fill the area to bring it up to the level of the surrounding gelcoat.
The filler I use is made up from the same colour gelcoat as the boat and Cabosil which is a fumed silica that thickens up the gelcoat into whatever thickness paste you want.
Add your catalyst and apply the paste so it’s slightly proud of the surrounding area. Once cured it will need to be faired to the desired shape.
Gelcoat
At this point all the spider cracks are gone and will not back, hurrah, you now need to think about getting some gelcoat over the repair area.
Unless you’re really good at colour matching or the boat isn’t too old and you can get some gelcoat from the manufacturer you may want to employ the services of someone like myself who will happily supply you with enough colour matched gelcoat to complete the job.
I will be doing a full guide on how to do the colour matching at some stage, but unfortunately you do need to have quite a few different colour pigments which isn’t always possible or economical for everyone who just does the odd repair.
Applying The Gelcoat
When it comes to applying gelcoat you need not only to cover the repair area, but also the existing gelcoat so you need to key up the surrounding are as well.
This can be done with some 320 grit sandpaper, once it’s all sanded simply brush off the area with a clean brush, don’t be tempted to use a cloth to wipe down because it will probably leave bits of fluff behind which will contaminate the gelcoat.
The gelcoat is applied in 3 coats with each coat being allowed to cure enough to apply the next coat without it dragging the previous one.
The last coat has a wax in styrene solution added to it. This allows the gelcoat to cure without it staying sticky.
The Next Step
Once the gelcoat has fully cured you need to flatten down the surface to remove all the brush strokes. This is done by again applying black spray to the entire repair area and then using wet and dry sandpaper wrapped around a block sand down until no more black spray can be seen.
To see a more detailed explanation of this process read the post I done here.
Polishing
Once you’re happy the gelcoat is flat you’ll need to polish it. This is best done with a more professional machine, not the type you get from places like Halfords that plug into your 12 volt car port, they just a waste of time for this job.
You’ll also need 2 compounds and a couple of lambswool bonnets, a course one and a fine one. The first compound is used with the courser lambswool and then finished off with the finer compound and finer finishing bonnet.
This combination will provide a lovely shine to your repair.
Conclusion
Don’t let the thought of using a grinder put you off this method, it will produce a much better result and it’s how the professionals do it. Take your time and you’ll end up with a repair that’ll last for years.
If you need any advice please don’t hesitate to contact me here and I’ll help you in any way I can.
Alternatively if you’ve already tried the repair yourself and it hasn’t turned out the way you wanted simply click the button below and I’ll happily give you a free estimate.